반응형
12.1 CNN의 등장과 작동 원리
- CNN은 딥러닝 기반의 학습을 이용해 26% 정도였던 오류율을 16%까지 떨어뜨림

- CNN에서 주변 정보들을 요약하고 특성을 추출하는 과정은 컨볼루션과 풀링
12.2 CNN을 이용한 문서 분류
12.2.1 CNN을 이용한 문서 분류의 원리
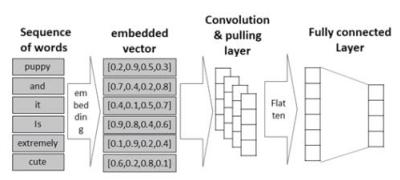
- 단어들의 연속된 나열에 대해 앞뒤 단어들 간의 주변정보를 요약해낼 수 있다면 문맥을 파악하는 것이 가능
- 문서 분류에서는 이미지에서 일반적으로 사용하는 conv2D 계층 대신 한 방향으로만 움직이는 conv1D 계층을 사용
- 단어의 시퀀스로부터 워드 임베딩을 이용해 각 문서에 대해 2차원 행렬로 변환하고, 컨볼루션과 풀링의 반복을 통해 요약 정보를 추출한 다음, 완전 연결 계층으로 구성된 분류기를 적용해 문서를 판별

12.2.2 CNN을 이용한 NLTK 영화 리뷰 분류
!pip install nltk

"""
Requirement already satisfied: nltk in /usr/local/lib/python3.10/dist-packages (3.8.1)
Requirement already satisfied: click in /usr/local/lib/python3.10/dist-packages (from nltk) (8.1.6)
Requirement already satisfied: joblib in /usr/local/lib/python3.10/dist-packages (from nltk) (1.3.1)
Requirement already satisfied: regex>=2021.8.3 in /usr/local/lib/python3.10/dist-packages (from nltk) (2022.10.31)
Requirement already satisfied: tqdm in /usr/local/lib/python3.10/dist-packages (from nltk) (4.65.0)
"""
import nltk
nltk.download('movie_reviews')
"""
[nltk_data] Downloading package movie_reviews to /root/nltk_data...
[nltk_data] Unzipping corpora/movie_reviews.zip.
True
"""from nltk.corpus import movie_reviews
import numpy as np
import tensorflow as tf
from tensorflow.keras.preprocessing.text import Tokenizer
from tensorflow.keras.preprocessing.sequence import pad_sequences
from sklearn.model_selection import train_test_split
#movie review data에서 file id를 가져옴
fileids = movie_reviews.fileids()
#file id를 이용해 raw text file을 가져옴
reviews = [movie_reviews.raw(fileid) for fileid in fileids]
categories = [movie_reviews.categories(fileid)[0] for fileid in fileids]
np.random.seed(7)
tf.random.set_seed(7)
max_words = 10000 #사용할 단어의 수
maxlen = 500 #문서의 단어 수를 제한
# 빈도가 높은 10000개의 단어를 선택하도록 객체 생성
tokenizer = Tokenizer(num_words=max_words, oov_token='UNK')
tokenizer.fit_on_texts(reviews) #단어 인덱스 구축
X = tokenizer.texts_to_sequences(reviews) #만들어진 단어 인덱스를 이용해 변환
X = pad_sequences(X, maxlen=maxlen, truncating='pre')
# label을 0, 1의 값으로 변환
label_dict = {'pos':0, 'neg':1}
y = np.array([label_dict[c] for c in categories])
X_train, X_test, y_train, y_test = train_test_split(X, y, test_size=0.2, random_state=10)from tensorflow.keras.models import Sequential
from tensorflow.keras.layers import Dense, Conv1D, MaxPooling1D
from tensorflow.keras.layers import Embedding, Dropout, Flatten
from tensorflow.keras.optimizers import Adam
model = Sequential([
#word embedding layer 생성
Embedding(max_words, 64, input_length=maxlen),
Conv1D(128, # 채널의 수
5, # 1D 필터 크기
padding='valid',
activation='relu',
strides=1),
MaxPooling1D(),
Conv1D(256, # 채널의 수
5, # 1D 필터 크기
padding='valid',
activation='relu',
strides=1),
MaxPooling1D(),
Flatten(),
Dense(64, activation='relu'),
Dense(1, activation='sigmoid') #binary logistic regression을 수행
])
model.summary()
"""
Model: "sequential"
_________________________________________________________________
Layer (type) Output Shape Param #
=================================================================
embedding (Embedding) (None, 500, 64) 640000
conv1d (Conv1D) (None, 496, 128) 41088
max_pooling1d (MaxPooling1D (None, 248, 128) 0
)
conv1d_1 (Conv1D) (None, 244, 256) 164096
max_pooling1d_1 (MaxPooling (None, 122, 256) 0
1D)
flatten (Flatten) (None, 31232) 0
dense (Dense) (None, 64) 1998912
dense_1 (Dense) (None, 1) 65
=================================================================
Total params: 2,844,161
Trainable params: 2,844,161
Non-trainable params: 0
_________________________________________________________________
"""adam = Adam(learning_rate=1e-3)
model.compile(optimizer=adam, loss='binary_crossentropy', metrics=['acc'])
history = model.fit(X_train, y_train,
epochs=20,
batch_size=256,
verbose=0,
validation_split=0.2)%matplotlib inline
import matplotlib.pyplot as plt
def plot_results(history, metric):
plt.plot(history.history[metric], 'b', label='Training '+metric)
plt.plot(history.history['val_'+metric], 'r--', label='Validation '+metric)
plt.title('Training vs. Validation '+metric)
plt.xlabel('Epochs')
plt.ylabel(metric)
plt.legend()
plt.show()
plot_results(history, 'loss')
#테스트 셋으로 학습된 모형의 성능을 평가
score = model.evaluate(X_test, y_test)
print(f'#Test accuracy:{score[1]:.3f}')
※ 해당 내용은 <파이썬 텍스트 마이닝 완벽 가이드>의 내용을 토대로 학습하며 정리한 내용입니다.
반응형
'텍스트 마이닝' 카테고리의 다른 글
| 어텐션(Attention)과 트랜스포머 (2) (0) | 2023.07.30 |
|---|---|
| 어텐션(Attention)과 트랜스포머 (1) (0) | 2023.07.29 |
| Word2Vec, ELMo, Doc2Vec의 이해 (2) (0) | 2023.07.27 |
| Word2Vec, ELMo, Doc2Vec의 이해 (1) (0) | 2023.07.26 |
| RNN-딥러닝을 이용한 문서 분류 (6) (0) | 2023.07.25 |


